

A small kitchen can become frustrating fast when counters fill up and useful cabinet space goes unnoticed. These Small Kitchen Storage Ideas focus on making overlooked areas work harder while keeping everyday essentials easy to reach and your cooking space comfortable to use.
Inside, you will find practical solutions for cabinets, drawers, walls, narrow gaps, counters, and awkward spaces above or below existing storage. In my experience, compact kitchens improve most when storage is planned around what you actually use rather than simply adding more containers. From pull-out pantry storage to drawer organizers and flexible rolling units, these 23 ideas will help you reduce visual mess, improve accessibility, and create a kitchen that feels more organized without requiring a complete remodel.
Table of Contents
Toe-Kick Drawers
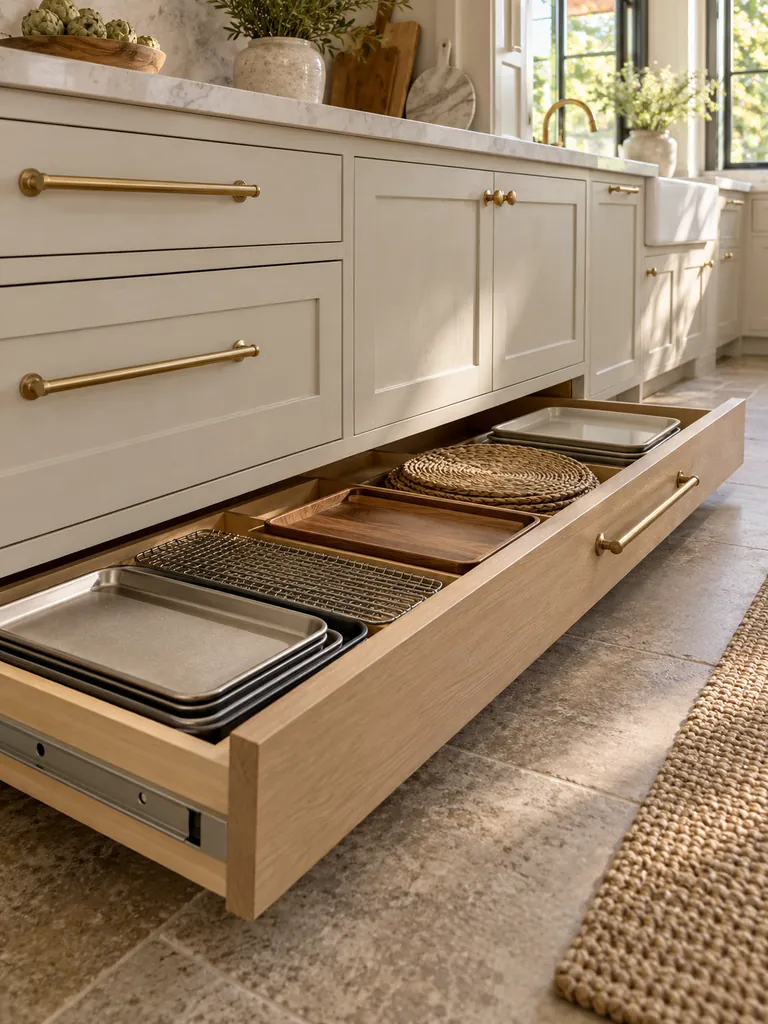
That narrow strip beneath base cabinets often hides storage potential that compact kitchens cannot afford to waste. Toe-kick drawers use this shallow area for flat items such as baking sheets, serving trays, cooling racks, placemats, and spare linens while keeping everyday cabinets available for bulkier kitchen essentials.
Measure the available depth carefully before choosing hardware because plumbing, vents, and cabinet supports may limit usable space. In my experience, these drawers work best for lightweight items you need occasionally rather than heavy cookware. Add a recessed pull or push-to-open mechanism so nothing projects into the walking area.
Cabinet Door Racks
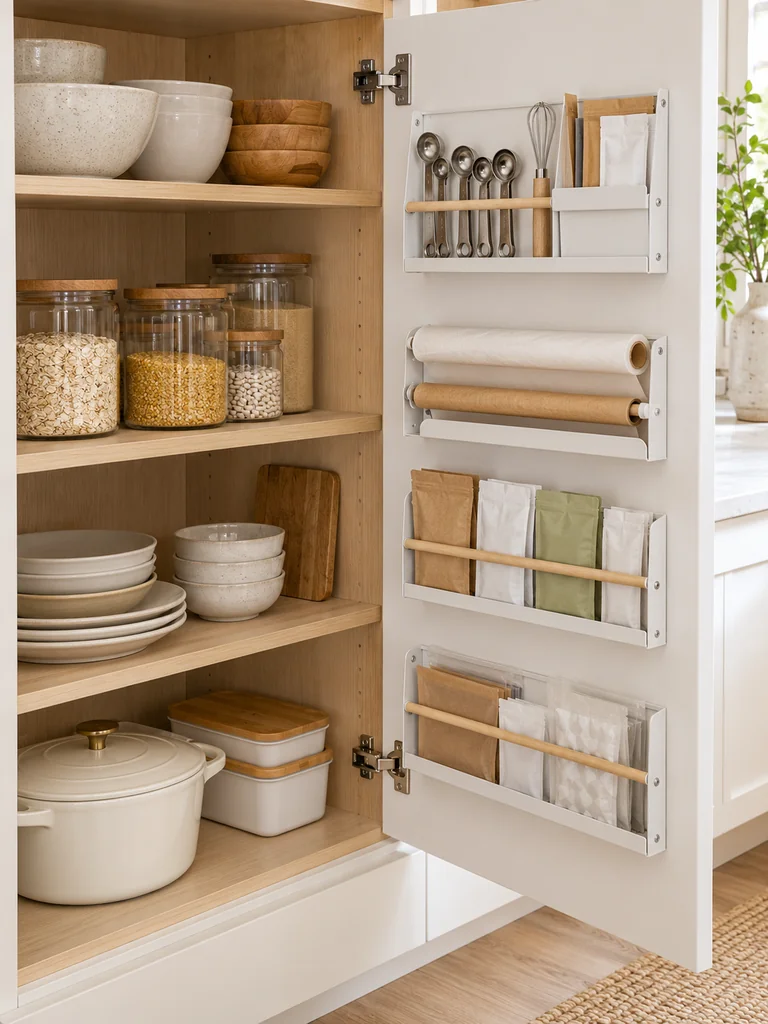
- Reserve upper cabinet doors for lightweight items such as measuring spoons, wraps, or small packets.
- Choose slim racks that leave enough clearance for interior shelves when the door closes.
- Measure handles, hinges, and shelf edges before installing any organizer.
- Keep frequently used items between waist and eye level for easier access.
- Use secure mounting hardware rather than overloading adhesive hooks with heavy containers.
Cabinet doors can provide useful storage without changing the kitchen footprint, but clearance matters more than capacity. Close the door slowly after installation and check for contact with shelves or stored items. A shallow organizer that closes smoothly is more useful than a deeper rack that constantly needs rearranging.
Pull-Out Pantry

Quick Tip:
Measure the narrow opening at its smallest point, including baseboards and countertop overhangs. Leave enough clearance for the pantry to slide fully forward without hitting nearby handles, appliances, or doorways.
A slim pull-out pantry turns an awkward gap into organized vertical storage for canned foods, jars, bottles, and packaged staples. Group similar items on each level and keep heavier products near the bottom for stability. Clear shelf boundaries also make it easier to notice supplies before buying unnecessary duplicates.
If your kitchen has no dedicated pantry at all, explore these small kitchen ideas without a pantry for practical ways to organize groceries using cabinets, walls, drawers, and narrow gaps.
Under-Sink Caddies

BEFORE:
Cleaning sprays, dishwasher supplies, sponges, and spare cloths often collect around plumbing with no clear zones. Small products disappear behind bottles, while leaks or damp items can go unnoticed at the back of the cabinet.
AFTER:
Portable caddies separate supplies by purpose and make the entire group removable in seconds. Plumbing stays accessible, while waterproof trays beneath the containers help protect the cabinet base from minor spills.
Choose handled caddies that fit beside pipes rather than forcing organizers around them. Keep daily cleaning products toward the front and less-used refills behind them. I’ve noticed that removable containers make under-sink cabinets much easier to clean because everything can be lifted out instead of moved bottle by bottle.
Vertical Tray Dividers
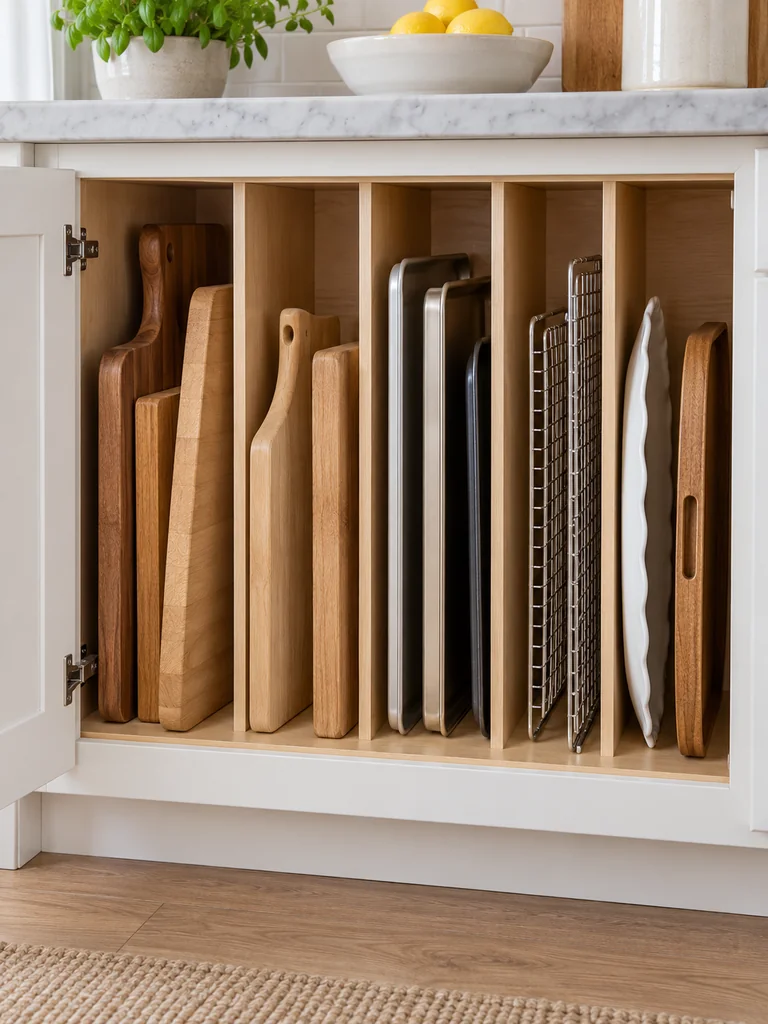
- Measure the cabinet height and depth before selecting dividers.
- Group baking sheets, cutting boards, cooling racks, and serving trays by similar size.
- Install sturdy vertical dividers with enough width for each group to slide out easily.
- Place frequently used boards toward the most accessible side.
- Keep very heavy pans in lower storage when possible.
Vertical storage prevents flat kitchen pieces from becoming a heavy stack that needs lifting whenever you want the bottom item. Give each category its own narrow slot rather than squeezing everything together. The setup works particularly well in lower cabinets where trays can be pulled forward with one hand.
Corner Cabinet Turntable

| Detail | Fixed Shelf | Turntable |
|---|---|---|
| Back access | Difficult | Easy rotation |
| Visibility | Items can disappear | Contents stay visible |
| Best items | Large cookware | Jars and bottles |
| Organization | Deep rows | Grouped sections |
Deep corner cabinets become frustrating when smaller ingredients disappear behind the first row. A correctly sized turntable brings stored items forward with a simple rotation, making sauces, oils, jars, and baking supplies easier to check. Leave a little space around the edge so bottles do not scrape the cabinet walls.
Stackable Shelf Risers
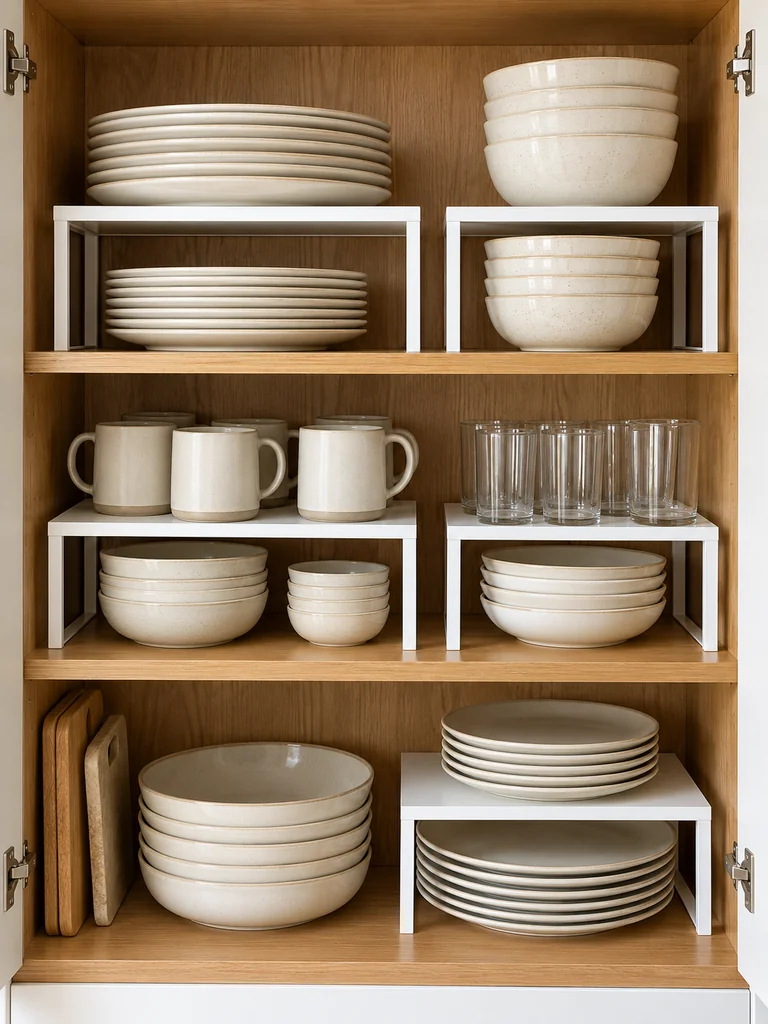
DO:
- Measure shelf height before choosing a riser.
- Store shorter dishes beneath the raised level.
- Keep lighter bowls and mugs on the upper tier.
- Leave enough clearance to remove items comfortably.
DON’T:
- Stack unstable risers on top of each other.
- Place heavy appliances on lightweight frames.
- Fill every inch until items become difficult to reach.
- Block adjustable shelf hardware.
Shelf risers make tall cabinet openings more useful by creating a second accessible level instead of one oversized stack. They work especially well for plates, bowls, mugs, and pantry containers. Choose a width that leaves some open space beside the riser so frequently used pieces can still be removed without shifting everything.
Deep Drawer Pegs

Cost: Moderate
Installation: Easy to Intermediate
Best For: Plates, bowls, and serving dishes
Result: Stable, adjustable drawer zones
Deep drawers can hold dinnerware efficiently, but dishes may slide whenever the drawer opens quickly. Adjustable peg systems create fitted zones around stacks of plates and bowls while allowing the layout to change later. Keep heavier dinnerware toward the center or rear, and avoid stacking dishes higher than the drawer sides.
Wall-Mounted Produce Baskets
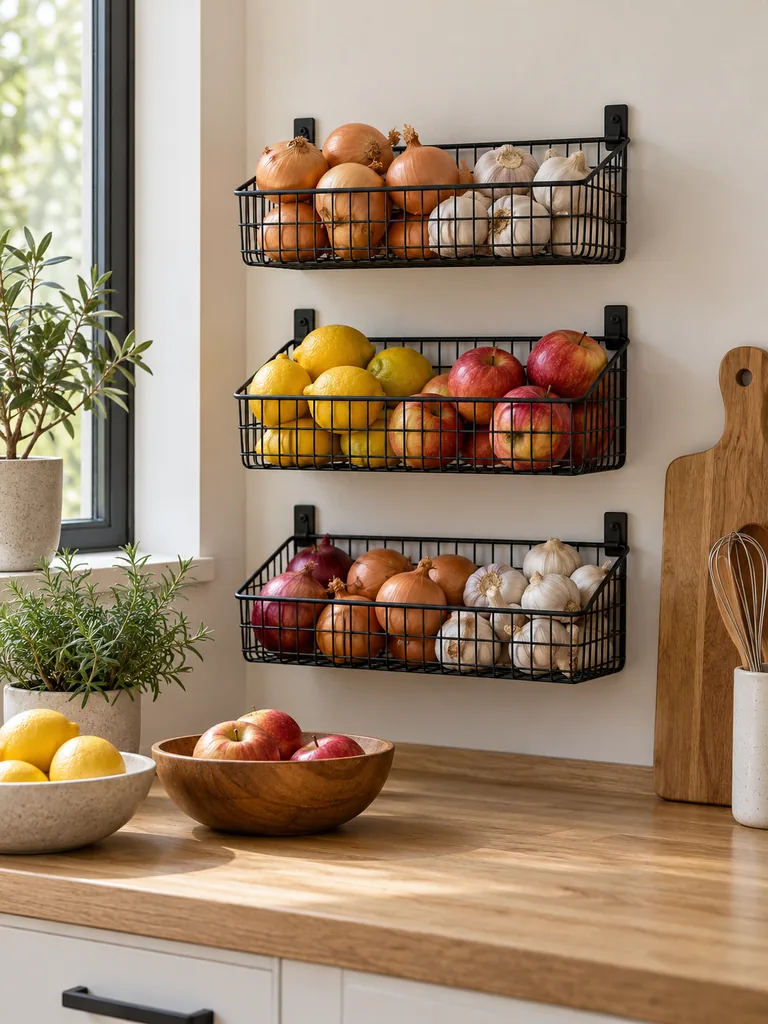
Empty wall space can become practical food storage when counters are already crowded. Mount two or three open baskets vertically for produce that stores well at room temperature, such as onions, garlic, and certain fruits. Keep each category separate so bruised or aging produce is easier to spot before it gets forgotten.
Choose washable wire or ventilated baskets and install them away from direct sunlight, cooking heat, and excessive moisture. In a compact layout, shallow baskets are usually easier to work around than deep containers. Keep heavier produce on the lowest level and avoid filling baskets beyond their rated weight capacity.
Magnetic Spice Rack

- Mount magnetic containers or a purpose-built rack on a suitable metal surface away from direct cooking heat.
- Keep everyday spices at comfortable eye or hand level for quicker access.
- Use matching containers so labels and quantities remain easy to scan.
- Check magnet strength before filling jars completely.
- Arrange spices alphabetically or by cooking frequency instead of random placement.
A magnetic rack moves small spice containers away from valuable cabinet and counter space while keeping frequently used seasonings visible. Avoid positioning jars directly beside a hot oven or steamy cooktop. For better organization, label the lids or fronts clearly and return each container to the same position after cooking.
Slim Fridge-Side Cart

Quick Tip:
Measure the narrowest point between the refrigerator and adjacent cabinet or wall before buying a cart. Maintain the ventilation clearance required by your appliance manufacturer instead of filling the entire gap.
A narrow rolling cart can hold canned foods, bottled drinks, wraps, or lightweight pantry supplies without requiring permanent cabinetry. Choose raised shelf edges so items remain secure while the cart moves. Keep frequently used products near the middle and avoid loading the top with tall containers that could tip when pulled forward.
Hanging Fruit Basket
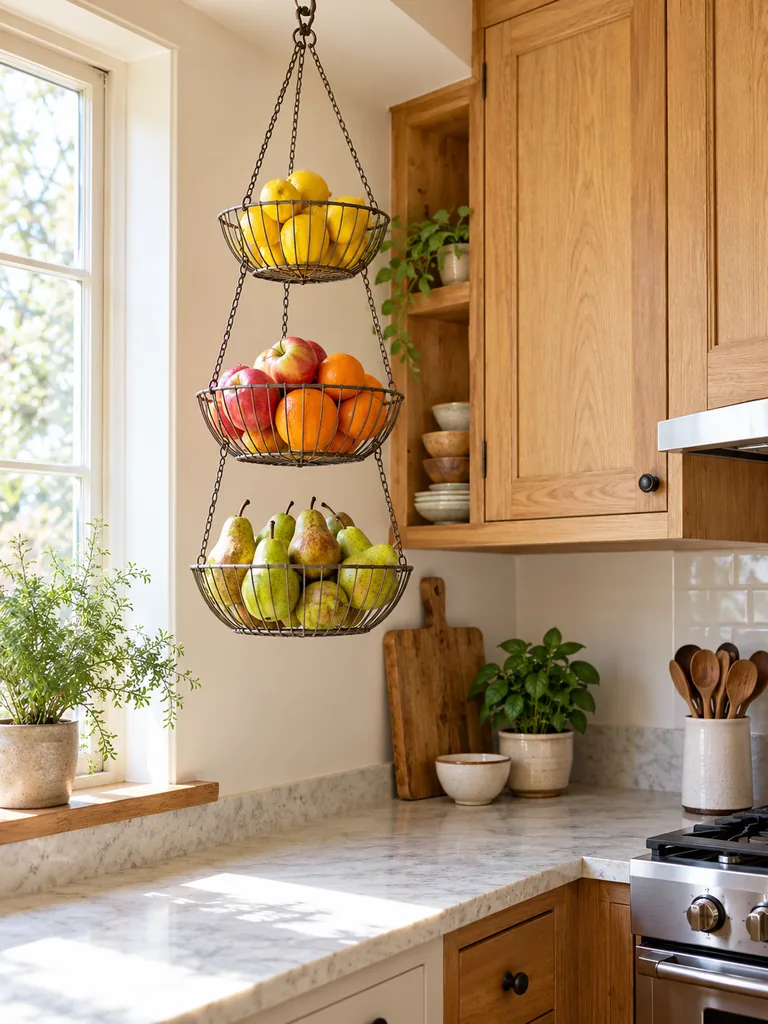
BEFORE:
Fruit bowls can consume a surprising amount of preparation space in a small kitchen. When several fruits are piled together, softer pieces may also become bruised or hidden underneath heavier produce.
AFTER:
A tiered hanging basket lifts suitable fruit above the counter and separates it across multiple levels. Open construction improves visibility and allows air to circulate around the contents.
Install the basket where it can hang freely without interfering with cabinet doors, lights, or walking routes. Keep heavier fruit in the lowest tier and delicate pieces above. Check ceiling hardware carefully before loading it, and avoid hanging produce directly over food preparation areas where the basket could become an obstruction.
Under-Shelf Baskets

- Measure the shelf thickness and available space underneath before choosing a basket.
- Slide the frame securely onto a sturdy cabinet shelf without forcing the brackets.
- Store lightweight items such as napkins, wraps, small towels, or packaged snacks inside.
- Leave enough clearance below the basket to access items stored underneath.
- Check the basket regularly for sagging or movement.
Under-shelf baskets capture unused space between cabinet levels without requiring permanent remodeling. They are especially helpful when shelves cannot be adjusted and a large vertical gap remains above shorter items. Keep the contents light and easy to remove so the basket does not place unnecessary strain on the shelf edge.
For more ways to use overlooked areas throughout your home, explore these small space storage ideas that keep everyday items organized without creating visual clutter.
Pot Lid Organizer
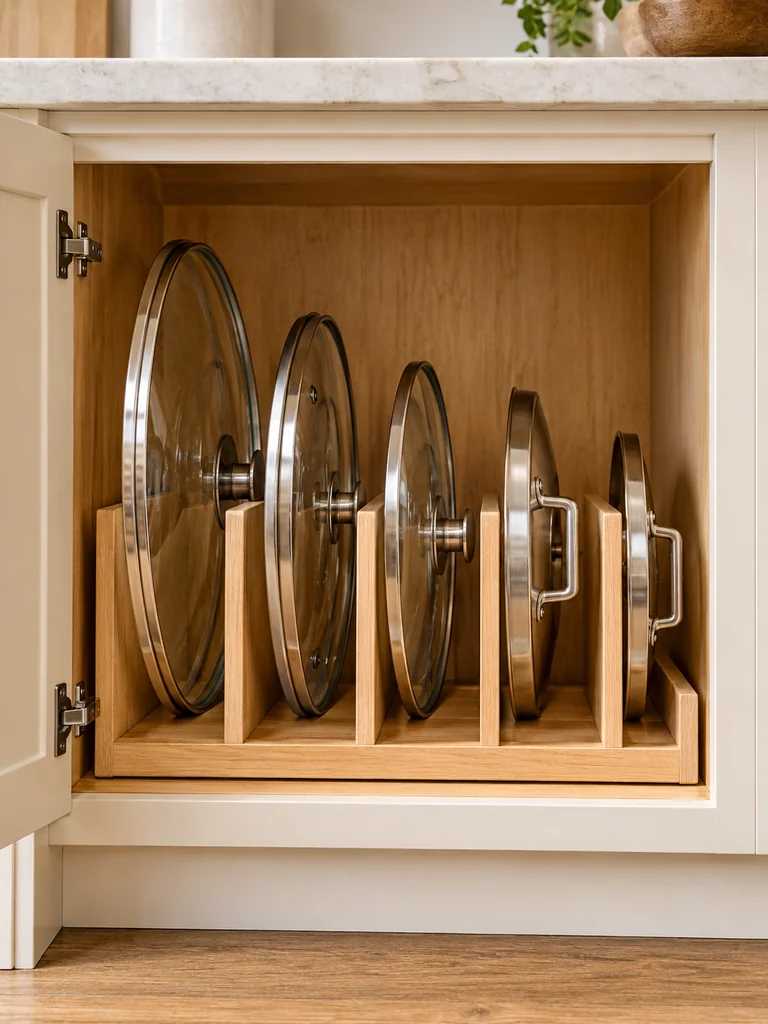
| Detail | Stacked Lids | Organized Lids |
|---|---|---|
| Access | Requires lifting | Individual access |
| Visibility | Sizes get hidden | Sizes stay visible |
| Cabinet space | Irregular piles | Defined vertical zone |
| Noise | Lids shift together | Less movement |
Pot lids become much easier to manage when stored vertically instead of piled beneath cookware. Choose a rack with slots wide enough for your handles and lid shapes, then arrange pieces by diameter. Position frequently used lids toward the front so you can grab the correct size without disturbing the rest of the cabinet.
For a more efficient morning routine, explore these small kitchen organization ideas that make breakfast essentials, utensils, and everyday supplies easier to access.
Expandable Pan Rack

DO:
- Adjust each slot to fit the thickness of your cookware.
- Store pans vertically when cabinet height allows.
- Keep heavier skillets in stronger lower sections.
- Test the rack for movement before filling it completely.
DON’T:
- Force several pans into one narrow slot.
- Balance heavy cookware on an unstable rack.
- Block cabinet hinges with oversized handles.
- Store pans while they are still damp.
An expandable rack gives frying pans, skillets, and shallow cookware defined positions instead of creating a heavy nested pile. Separating pieces also reduces the need to lift several pans to reach one underneath. Choose a sturdy model that fits the cabinet depth and adjust spacing around the cookware you actually use.
Countertop Appliance Garage
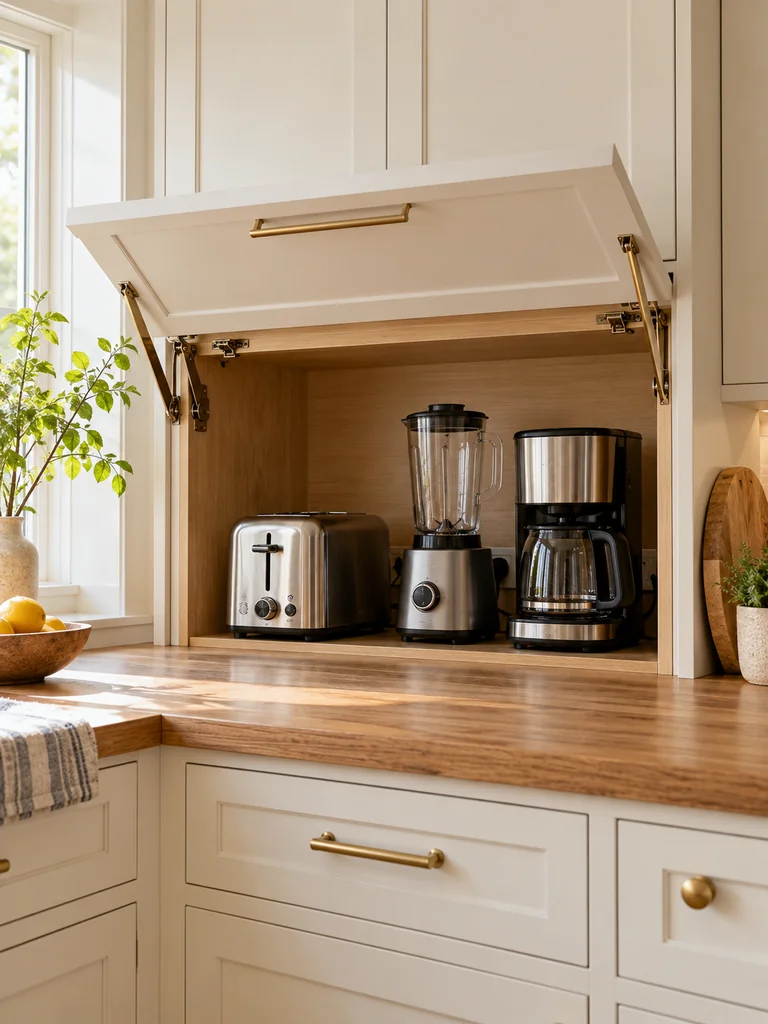
Cost: Moderate to High
Best For: Toasters, blenders, coffee makers
Skill Level: Intermediate
Result: Clearer preparation surfaces
Bulky appliances can make a small counter feel crowded even when the kitchen is otherwise organized. An appliance garage gives frequently used machines a dedicated home while keeping them close to an outlet. Check ventilation and manufacturer guidance before operating appliances inside enclosed cabinetry, and keep cords positioned away from moving doors.
If appliances are only part of what is crowding your work surface, explore these small kitchen counter organization ideas for practical ways to organize daily essentials, create clear zones, and reclaim valuable prep space.
Backsplash Rail Storage

A slim rail can make the backsplash work harder without consuming preparation space. Add movable hooks and compact holders for lightweight utensils, measuring tools, oven mitts, or other frequently reached items. Position the rail where hanging pieces remain easy to grab but cannot interfere with burners, electrical outlets, or food preparation.
Keep the arrangement selective rather than hanging every available utensil on display. I’ve noticed that wall storage feels much calmer when similar tools are grouped together with visible gaps between them. Choose washable metal components for easier maintenance, particularly near areas exposed to cooking splashes, grease, or moisture.
Over-Fridge Storage Bins
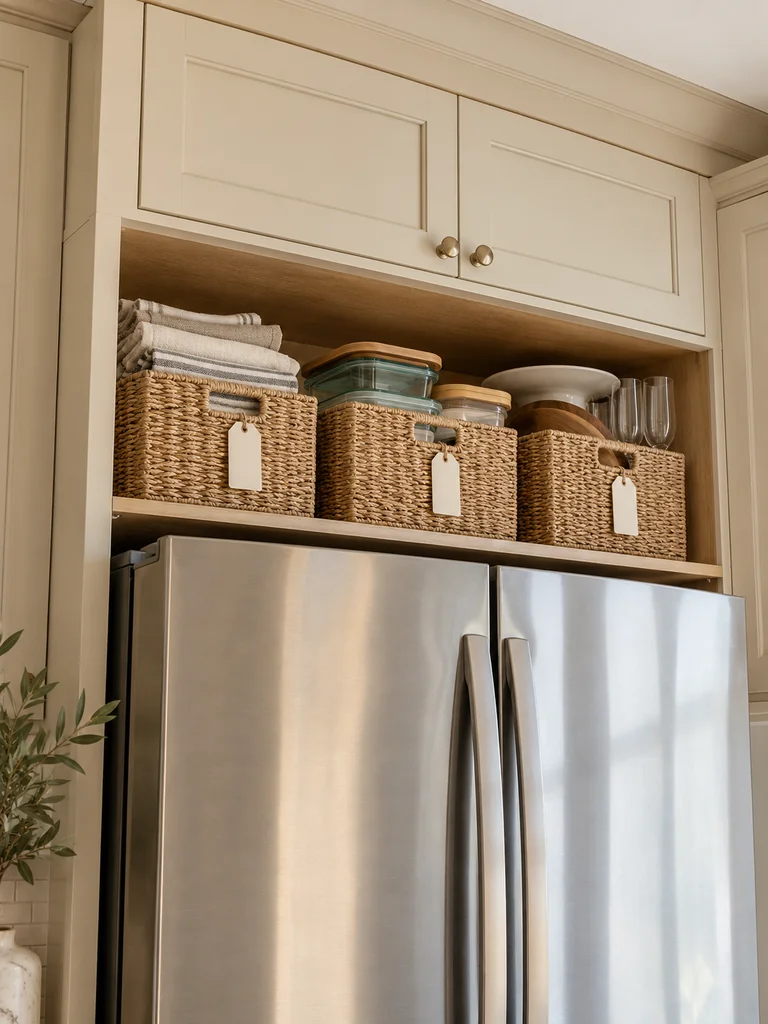
- Measure the open area above the refrigerator, including cabinet doors and required appliance clearance.
- Use lightweight handled bins for items that are needed only occasionally.
- Group similar supplies together, such as party accessories, spare linens, or reusable containers.
- Add simple labels that can be read from below.
- Keep heavy, fragile, or frequently used items in easier-to-reach storage.
The space above a refrigerator can handle overflow storage when it remains safe and accessible. Choose containers that can be pulled forward without awkward lifting, and never interfere with required ventilation. Since this area is less convenient, reserve it for lightweight supplies rather than everyday cookware or anything that could spill when lowered.
Sink-Side Storage Rail

Cost: Low to Moderate
Installation: Easy
Best For: Brushes, cloths, and small cleaning tools
Result: Clearer sink edges
Wet cleaning tools quickly make a compact sink area feel messy. A slim rail gives brushes, cloths, and suitable accessories defined hanging positions while leaving the counter easier to wipe. Choose moisture-resistant hardware, keep items away from food preparation zones, and allow damp tools enough space to dry between uses.
Rolling Island Storage

A rolling island adds flexible storage where permanent cabinetry may not fit. Look for a narrow model with drawers, shelves, or enclosed compartments for cookware and frequently used supplies. Locking wheels help keep the unit stable during food preparation, while a durable top can provide extra workspace when counters become crowded.
Measure the full travel path before bringing an island into a compact kitchen. In my experience, mobile storage works best when it has a designated parking spot rather than remaining in the center of the room. Maintain comfortable clearance around appliances, cabinet doors, and the main walking route.
For more storage solutions that work beyond the kitchen, explore these small apartment storage ideas designed to add useful space without adding unnecessary bulk.
Cookbook Side Slot
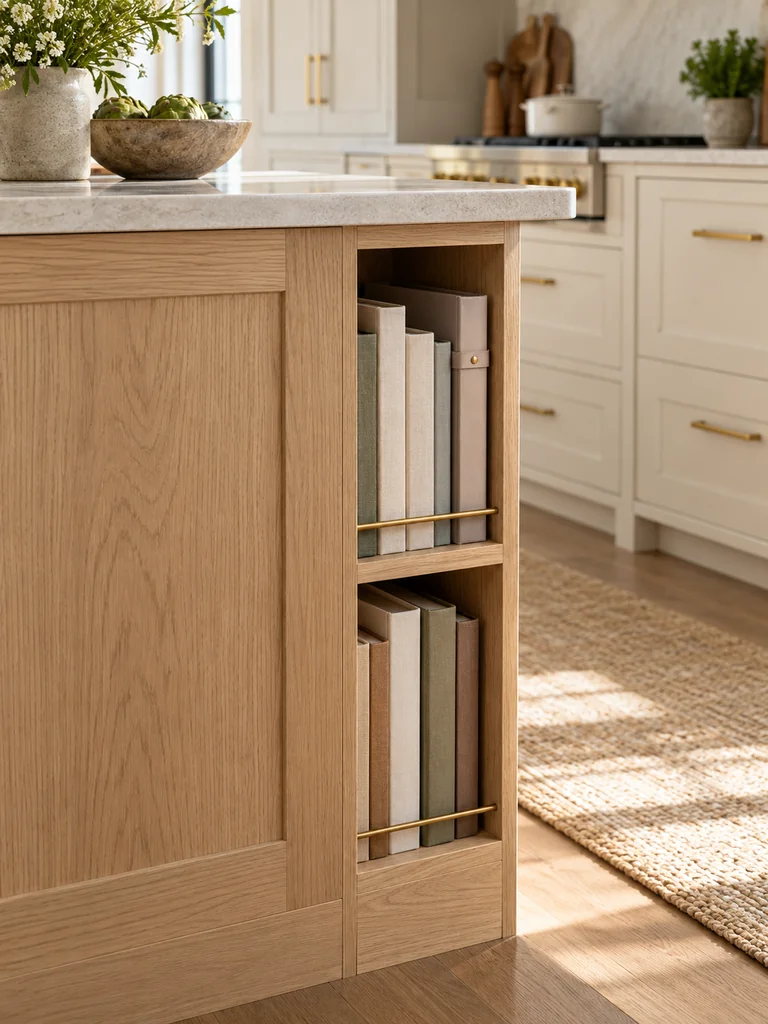
- Choose a narrow cabinet-side space that does not interfere with drawers or appliance doors.
- Store only frequently used cookbooks and recipe binders there.
- Keep books upright with a slim divider so they do not lean into the workspace.
- Position the slot away from sink splashes and direct cooking heat.
- Leave enough width to remove individual books without pulling out the entire group.
A slim cookbook slot turns a narrow vertical gap into useful storage without taking over the countertop. It works especially well beside a cabinet end panel or kitchen island. Keep the collection edited to books you actually use, while less-used recipes can stay in another storage area.
Dining Bench Storage

BEFORE:
A compact dining nook can lose valuable space when chairs and benches serve only one purpose. Less frequently used linens, serving pieces, and kitchen supplies may then spill into already crowded cabinets.
AFTER:
A storage bench combines seating with a concealed compartment beneath the seat. Organized bins inside keep occasional-use items separated while leaving the dining area visually calm and functional.
Choose a bench with a safe lifting mechanism and enough clearance for the seat to open fully. Reserve the compartment for lightweight items that do not need daily access, such as table linens or entertaining supplies. Avoid overfilling it, since a storage bench works best when everything inside remains easy to retrieve.
For more ways to combine dining space with practical kitchen design, explore these small apartment kitchen ideas featuring compact furniture, clever layouts, and space-saving solutions.
Open Shelf Zones

- Assign each shelf a clear purpose, such as everyday dishes, drinkware, or frequently used pantry staples.
- Keep the most-used items within comfortable reach.
- Group similar pieces together instead of mixing unrelated kitchen supplies.
- Leave visible space between groups so the shelves remain easy to scan.
- Move rarely used or visually distracting items into closed storage.
Open shelving becomes more practical when every section has a defined job rather than acting as overflow space. Among Small Kitchen Storage Ideas, this approach can improve visibility without adding another cabinet. Keep quantities limited to what you regularly use, and review the shelves occasionally before clutter begins building again.
Conclusion
Better kitchen storage starts with using the space you already have more intentionally. These Small Kitchen Storage Ideas can help you clear crowded counters, improve cabinet access, and give everyday items a practical home. I’ve noticed that fixing one frustrating storage area often makes daily cooking and cleanup noticeably easier. Start with the spot that causes the most clutter, then add other solutions only when they solve a real problem. Save this post on Pinterest so you can revisit your favorite ideas, try the ones that suit your kitchen, and share it with someone working with limited kitchen space.